
Common invocations of MegaCLI
Get an Overview of controllers and attached disk arrays
./MegaCli64 -AdpAllInfo -aALL (extracted info below)
./MegaCli64 -CFGDsply -aALL shows same info, with same verbosity
Adapter #0
========================================
Product Name : PERC H800 Adapter Serial No : 25B0088
Link Speed           : 0
 Number of Frontend Port: 0
 Device Interface  : PCIE
Number of Backend Port: 8
 Port  :  Address
 0        500c04f2e958eebf
 1        500c04f2e958ee3f
 2        0000000000000000
 3        0000000000000000
 4        0000000000000000
 5        0000000000000000
 6        0000000000000000
 7        0000000000000000
Device Present
 ================
 Virtual Drives    : 1
 Degraded          : 0
 Offline               : 0
 Physical Devices  : 13
 Disks                : 12
 Critical Disks     : 0
 Failed Disks      : 0
(snip)
Adapter #1
==============================================================================
Product Name : PERC 6/i Integrated
Serial No : 1122334455667788
Device Present
 ================
 Virtual Drives      : 1
 Degraded            : 0
 Offline                : 0
 Physical Devices  : 3
 Disks                  : 2
 Critical Disks       : 0
 Failed Disks         : 0
Settings
 ================
 Current Time                     : 12:16:19 6/18, 2013
 Predictive Fail Poll Interval    : 300sec
 Rebuild Rate                     : 30%
 Reconstruction Rate              : 30%
 Cache Flush Interval             : 4s
 Max Drives to Spinup at One Time : 2
 Delay Among Spinup Groups        : 12s
 Restore HotSpare on Insertion    : Disabled
 Expose Enclosure Devices         : Disabled
 Maintain PD Fail History         : Disabled
 Maximum number of direct attached drives to spin up in 1 min : 0
 Auto Enhanced Import             : No

Capabilities
 ================
 The last paragraph above mentions many unusual RAID levels. Here is a brief explanation of the more exotic.
 RAID Level Supported             :
     RAID0, RAID1, RAID5, RAID6, RAID00, RAID10, RAID50, RAID60, PRL 11, PRL 11 with spanning,
     SRL 3 supported, PRL11-RLQ0 DDF layout with no span, PRL11-RLQ0 DDF layout with span
 Supported Drives                 : SAS, SATA
— Explanations of RAID Levels
This PDF explains secondary level raid etc: http://www.snia.org/sites/default/files/SNIA_DDF_Technical_Position_v2.0.pdf
- RAID6 – Dual Parity RAID:
Striped stripes: Break up a file into stripes and stripe it across all drives. Need multiple raid controllers and large files for this to provide benefit. - PRL11-RLQ0 layout : aka RAID1E Integrated Adjacent Stripe Mirroring
Each block is written twice. The location of the mirror/parity block is defined is being in the same extent, but on the next adjacent disk. Spanning is needed when you have different sized Basic Virtual Drives (subdisks). - SRL3: Spanned Secondary Raid Level 3:
(less protection) : data stripes are allocated pretty much where ever they can be – striped or concatenated from any available subdisks (aka bvd). The subdisk may or may not be raid-protected. - RAID Level Qualifier:
This little guy says nothing about the level of protection, only that there are several ways to “skin a disk”. RLQ assigns numbers to them.
Examine drives on one adapter
root@auspcrpbak03:MegaCli> ./MegaCli64 -LdPdInfo -a0
Notes: There are 12 drives of about 1.8TB. We’re running RAID6, so we expect to lose 2 drives to parity and get 18TB.
Adapter #0
Number of Virtual Disks: 1
 Virtual Drive: 0 (Target Id: 0)
 Name                     :Virtual Disk 0
 RAID Level              : Primary-6, Secondary-0, RAID Level Qualifier-3
 Size                        : 18.188 TB                  ( This is size presented to OS )
 Sector Size              : 512
 Parity Size               : 3.637 TB          (In addition to the 18T. For RAID6 we have two)
 State                       : Optimal
 Number Of Drives     : 12
 Current Cache Policy : WriteThrough, ReadAdaptive, Direct, No Write Cache if Bad BBU Number of PDs: 12
Source: http://www.snia.org/sites/default/files/SNIA_DDF_Technical_Position_v2.0.pdf
 --- PD: 0
Information Enclosure Device ID: 252
Slot Number        : 0
Drive's position    : DiskGroup: 0, Span: 0, Arm: 0
 Enclosure position: N/A
Device Id             : 7
WWN: 5000C500558ADE08
Sequence Number: 2
Media Error Count : 0
PD Type               : SAS
Raw Size: 1.819 TB [0xe8e088b0 Sectors]       (This is real 1024M size, not 1000M. It's sold as a 2TB drive)
 Firmware state:    Online, Spun Up Device
 SAS Address(0):   0x5000c500558ade09
 SAS Address(1):   0x5000c500558ade0a
 Connected Port Number:   1(path0) 0(path1)
 Inquiry Data:         SEAGATE ST32000645SS    RS0FZ1K0AV9E
 Drive has flagged a S.M.A.R.T alert : No
PD: 1
 Information Enclosure Device ID: 16
 Slot Number:                              1
 Drive's position:   DiskGroup: 0, Span: 0, Arm: 1 Device Id: 12
 WWN:                                        5000C500558AEBA4
 Sequence Number:                     2
 Media Error Count: 0 PD Type:    SAS
< and much more >
Optional toppings for most LD configurations:
- WT : WriteThrough safer. Only returns once data is written to disk.
- WB: WriteBack faster. Returns as soon as data is is written to cache
- NORA : No Read Ahead vs
- RA: ReadAhead vs
- ADRA : Adaptive ReadAhead where if the previous two requests were sequential, it pre-loads the next in sequence.
- Cached: Cache reads.
- Direct: Only the previous read is cached.
- -strpszM : Stripe size so -strpsz64 means 64kb stripe size.
- Hsp[E0:S0] : Choose this drive to be a hot-spare
Dump the Event Log for the Adapter
./MegaCli64 -AdpEventLog -GetLatest 20 -f /tmp/events.txt -a0
Find your Enclosure Number
The first few lines of the command :
./MegaCli64 -EncInfo -aALL
will print the adapter ‘Number of enclosures on adapter 0‘ along with the enclosure ID and Device ID.
My output shows one adapter (my RAID card), one enclosure (enclosure 0) with device ID 252 and 8 slots.
I will address all disks on this raid card as being on enclosure 252. ( ie. I replace E0 or E1 with 252)
I re-run the command to verify my adapter
./MegaCli64 -EncInfo -a0
Then run this to see the physical disks attached to it
./MegaCli64 -LDPDInfo -a0 | egrep “^PD: |^Enclosure Dev|^Device Id:|^Firmware |^Raw Size|^Inquiry”
Specify a Disk
A PhysDrv is specified using the Enclosure : DeviceID
Manuals abbreviate this as E0:S0
In the output above, I colored the Enclosure (252) and DeviceID (7) in purple to make it visible. I can describe that disk as follows [252:7]
./MegaCli64 -PDInfo -PhysDrv[252:7] -a0
Build a Virtual Disk
MegaCli -CfgLdAdd -rX [E0:S0,E1:S1,…] [WT|WB] [NORA|RA|ADRA] [Direct|Cached] [CachedBadBBU|NoCachedBadBBU] [-szXXX [-szYYY …]]
[-strpszM] [-Hsp[E0:S0,…]] [-AfterLdX] | [Secure]
[-Default| -Automatic| -None| -Maximum| -MaximumWithoutCaching] [-Cache] [-enblPI] [-Force]-aN
rX : Raid Level X. You can see your options by looking at the raid adapter settings (top of this page).
In this example we can choose 0,1,5,6,00,10,50,60 and more
[E0:S1,E0:S3] – Enclosure0:Slot1, Enclosure0:Slot3 : 2 Drives to use in the VD. Include the square brackets.
For example [252:7,252:3] Your enclosure number can be found in the output of -PDLDinfo
Configure disks as JBOD
MegaCli64 -AdpSetProp -EnableJBOD 1 -a0
Configure RAID 10
MegaCli64 -CfgSpanAdd -r10 -Array0[32:6,32:7] -Array1[32:8,32:9] -Array2[32:10,32:11] -a0
The disks in each array (32:6 and 32:7 for example) must be the same size, but array0 and array1 do not have to be the same size, per
SNIA spec.
Delete the first logical drive on the first controller
MegaCli64 -CfgLdDel -L0 -a0
Replace a Failed Drive
MegaCli64 -PDInfo -PhysDrv [32:4] -a0 | grep “^Firmware state:” ( should show failed )
MegaCli64 -PDOffline -PhysDrv [32:4] -a0
MegaCli64 -PDPrpRmv -PhysDrv [32:4] -a0 or
MegaCli64 -PDMarkMissing -PhysDrv [32:4] -a0 (if you won’t actually remove the drive)
Pull the drive, insert a new one
MegaCli64 -Pdgetmissing -a0
No. Array Row Size Expected
0 1 4 1907200 MB
MegaCli64 -PdReplaceMissing -PhysDrv [32:4] -Array1 -row4 -a0
Rebuild the Array
MegaCli64 -PDRbld -Start -PhysDrv [32:4] -a0
Show Battery Backup Info
MegaCli64 -AdpBbuCmd -aALL
RAID Rebuild Rate – Increase to 90 Percent
MegaCli64 -AdpSetProp BgiRate 90 -aALL
Save configuration to filesystem
MegaCli64 -CfgSave -fFilename -a0
When you replace controllers, you can duplicate the previous config. In BIOS look for ‘Add Saved Configuration’. Say ‘Y’ to the warning to import it from the disks. (Be sure that your disk array is healthy first.)
RAID 10 and variants
Due to Dawid’s comment below, I did some more research, refreshed my recollections about RAID10 and similar configurations and have the following comments.
RAID10 is shorthand for RAID1+0 which is a stripe across mirrors. (Take RAID1/mirrored disks and RAID0/stripe them).
RAID01 is shorthand for RAID0+1 which mirrors disks that are striped. (Take RAID0 disks and RAID1/mirror them).
RAID01 is a less common config because RAID10 offers more redundancy (a big reason for why we RAID) and few disadvantages compared to RAID01.
In the case of four disks (which is a common config), I don’t (personally) see a big difference, but things get interesting when you have six or more disks. So let’s start there.
At this point, an analogy may make things more interesting, even if most readers already fully understand what I am saying. When I was younger, I played a game called Battleships. Assuming you have to carry eight squares of cargo, which would you prefer: two four-unit battleships or four two-unit destroyers? When the bombs start falling, you would much prefer to have your cargo in four different locations. While this is true when a malevolent opponent is trying to locate and destroy your ships, it’s also true when chaos sets in on your disk arrays. Forcing Murphy to precisely take out both disks in the same mirror (for example both yellows from the left picture), rather than one disk from each stripe is a better strategy.
- Illustration of RAID01 in a 2-by-4 config versus RAID10 in a 4-by-2 config
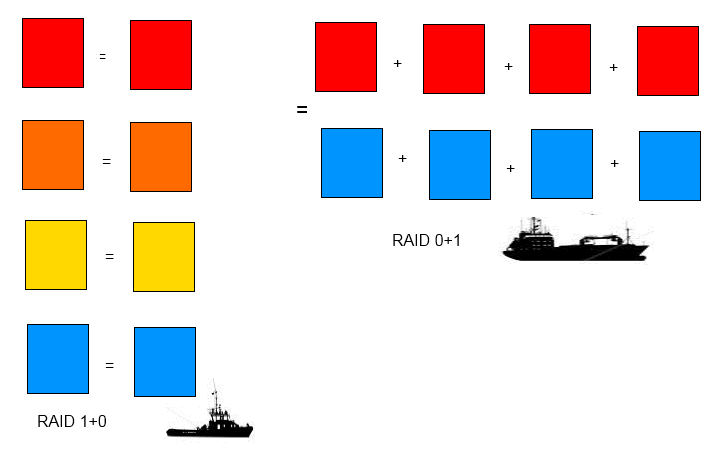
The image also clarifies somewhat the “Primary” and “Secondary” listings in the output from megacli. Primary is the “RAID1” part of “RAID1+0” (say the two yellow squares). It is the fundamental building block of the array. The “Secondary” field is how you organize the primal units you first created. For a RAID1+0, we stripe them (RAID 0).
Dawid’s situation was that he has 4 disks, but they show as (Pri-1, Sec-0, Qual-0) which is how megacli’s represents a plain mirror. I suspect that he manually created the striped disks then mirrored them and that megacli did not keep track of all the steps. I expect that it will work out just fine, but it would be more obvious and faster if next time he ran ‘megacli -CfgLdAdd -r10 …’

Man, that Explanation of Raid Levels is awesome!!! Thanks!
hi a little typo:
MegaCli64 -AdpSetProp BgiRate 90 -aALL
Fixed. Thanks Fader.
Hi, great work, man, but I’m afraid there might be a mistake in the Explanation of Raid Levels section. Check the output I get:
# megacli -LDInfo -Lall -aALL | grep RAID
RAID Level : Primary-1, Secondary-0, RAID Level Qualifier-0
According to your table this would mean I’m running a RAID-1 array. However…
# megasasctl
a0d0 7451GiB RAID 10 2×2 optimal
a0e252s0 3726GiB a0d0 online
a0e252s1 3726GiB a0d0 online
a0e252s2 3726GiB a0d0 online
a0e252s3 3726GiB a0d0 online
There is clearly a dissonance here and I don’t know where the mistake is hiding.
Nicely said – “clearly a dissonance”. I assumed I was wrong when I read your post, but I see other people also posting that RAID1 is shown as ‘Primary-1,Secondary-0,RAID Level Qualifier-0’ and I don’t have access to these boxes anymore to test. So I’ll leave the post as is until I get more data points. It’s even possible that newer versions of megacli are more correct. This is an old post.
Based on the docs, I would guess that RAID1 SHOULD be Primary-1, RLQ-0 (with no mention of Secondary because there is not a secondary protection in RAID1. Instead secondary-0 is supposed to mean ‘striped’ not ‘none’), but that’s just off the top of my head.
Adam, I’ve asked about this on serverfault.com as well as here, please check for more details (including output from megasasctl) there: http://serverfault.com/questions/595005/raid-level-confusion-megacli-vs-megasasctl-output
The RAID levels are standardized and defined in this documentation: http://www.snia.org/tech_activities/standards/curr_standards/ddf
XCorvis –
Thank you. We have all been looking at that site, but what we are looking for is documentation from the
megacli command and what it should show for primary and secondary values for RAID1 versus RAID10.
For both RAID1 and RAID10, “Primary-1” is correct.
What are the values for Secondary for both RAID1 and RAID10?
I believe the megacli docs are pulling the data straight out of the SNIA documentation: PRL = Primary Raid Level, SRL = Secondary Raid Level and RLQ = Raid Level Qualifier.
RAID10: Primary-1, Secondary-0, RAID Level Qualifier-0
RAID1: Primary-1, Secondary-1, RAID Level Qualifier-0
PRL1 is a mirror, SRL0 is striped so RAID10 is a mirror of striped drives. I’m guessing on RAID1 since I don’t actually have one handy. SRL1 is mirrored so it would make sense to be mirrored/mirrored but since there are only 2 drives the second layer of mirroring isn’t relevant.
How about expanding a raid-10 array, that i have not seen anyone discuss, not even the LSI documents. Is it possible?
Highly descriptive post, I enjoyed that bit. Will there be a
part 2?
I suggest using Megasasctl for proper RAID level output.
http://sourceforge.net/p/megactl/wiki/Home/
Hi,
just came here one more time since you’re like the only person on the planet that documented the format and unit for the -strpsz option.
Thanks a lot, since that meant I could successfully rebuild the Raid10 I had just dropped so clumsily when I tried to delete another volume.
few things aren’t explained clear enough but this paragraph start also with totaly wrong explanation :
WT : writethrough faster. Data in disk cache is considered written. vs
WB: write-back safer. Only considered to be written once on disk.
Should be :
WB : cached, usually faster
WT: safer : data are writen to disk immediately
Thank you for the feedback Dejan. I had them backward, but have corrected it now
Hi,
Great explanaition, very usefull.
Do you know if the JBOD command:
MegaCli64 -CfgEachDskRAID0 -a0
actually formats a disk. Is the existing data wiped from the disk?
I would like to use it on existing disk, but without loosing the data it contains.
Tx
Good timing for your question, Buzz! I *just* blew up a couple drives on my home lab doing this exact thing earlier this week (I’ll post the war story once I get an satisfactory resolution. Happily they didn’t have any important data – which is why I didn’t plan it out first).
In short – IMO you may LOSE your data if you run the command above – which says ‘I want this disk to become a RAID 0 volume’. The controller will respond by writing an LSI RAID ‘Disk Data Formatted’ header to the last 512MB of each disk and presenting the OS with a virtual disk without this header. (I have updated the example commandline I listed for JBOD above).
Before doing this you definitely need to save off your important files and save a copy of your partition table to have a fighting chance to reconstruct it later. Remember that if you boot from this drive, be prepared in case that stops working.
I think that the command which you (and I) are actually looking for is the command ‘MegaCli64 -AdpSetProp -EnableJBOD 1 -a0’, which I believe tells the controller to use the drives as just plain disks. (Of course, do figure out your path to recovery if it doesn’t go well… I haven’t tested it).
Hi, I think your Raid 10 config line above, ie MegaCli64 -CfgSpanAdd -R10 -Array0 [E0:S1,E0:S2,E0,S3] -Array1 [E1:S0,E1:S1,E1:S2] may be wrong – when I tried it I got a ‘create failed’ message (something like that anyway). I had to use
megacli -CfgSpanAdd -r10 -Array0[32:6,32:7] -Array1[32:8,32:9] -Array2[32:10,32:11] -a0
As far as I can tell this has produced the correct result ie each array is a pair of mirrored disks, and the arrays are striped together.- there are 6 x 2TB disks in the array below:
Virtual Drive: 2 (Target Id: 2)
Name :
RAID Level : Primary-1, Secondary-0, RAID Level Qualifier-0
Size : 10.914 TB
Mirror Data : 10.914 TB
State : Optimal
Strip Size : 64 KB
Number Of Drives per span:2
Span Depth : 3
Thank you, Chris. It has been years since your comment, but it looks much more likely to do what we want. I’ve updated my invocation.
Hello. There is a good python+bash script that parsing all needed data:
That’s a very nice script indeed. Thank you for sharing, Aloxin.
Also credit to Adam Cecile & Vincent Cojot
—
Here is the original : https://github.com/lordadamson/megaclisas-status
And your copy (good idea to have two sources in case one goes offline): http://sysadm.pp.ua/wp-content/uploads/2016/01/megaraid_status.rar
Pingback: RAID: Explain RAID lvl MegaCLI output | .